In a previous post I provided some notes related to setting up Hugo. In this post I continue with my Hugo journey, but focus on information related to hosting the site with GitLab Pages.
Steps for getting GitLabPages setup
Make a new repo on GitLab.
- I followed the naming convention provided byt GitLab, found here
- Using those conventions I named the project “wetlandscapes.gitlab.io”, which was different than my working title, “wetlandscapes”. I’ll probably change it again to “wetlandscapes.com” once I’ve updated the domain.
- I initialized with a README.md, but that’s not really necessary, since that can make conflicts later (better to intialize with an empty repo and add the README later).
- Made the repo private at first, but then made it public. I think it has to be public for the website to work, but don’t quote me on that.
Make the file
.gitlab-ci.yml(found directions on the Hugo site)Add the following to the above file:
image: monachus/hugo variables: GIT_SUBMODULE_STRATEGY: recursive pages: script: - hugo artifacts: paths: - public only: - master- Though my site ran perfectly well with the above CI file, the bookdown site suggests the following alternative:
image: debian:buster-slim

before_script:
  - apt-get update && apt-get -y install pandoc r-base
  - R -e "install.packages('blogdown',repos='http://cran.rstudio.com')"
  - R -e "blogdown::install_hugo()"

pages:
  script:
    - R -e "blogdown::build_site()"
  artifacts:
    paths:
      - public
  only:
    - master
Add the
public/directory to my.gitignorefile, since the site is going to be built with continuous integration.Clone the repo.
- Navigate the the parent directory I’ll be working on.
- Copy the HTTPS information (I probably could used SSH):
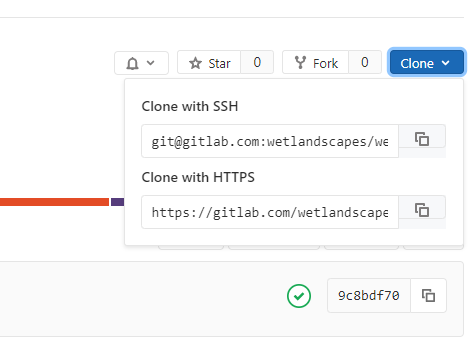
- From the command line:
git clone https://gitlab.com/wetlandscapes/wetlandscapes.gitlab.io.git
Copy the data from the working directory to the site directory
- Renamed the .Rproj file to “wetlandscapes.gitlab.io” for the sake of consistency.
- I also added
.Rhistoryto the.gitignorefile.
Upload the site to GitLab
git add .- Check that all the files are the expected ones (e.g., no OAuth credentials or random stuff).
- `git commit -m “First commit of the new site.”
BOOM! Site loaded.
Because GitLab uses continguous integration with Hugo sites, it builds the site on the server side, which means it is making the public/ folder that eventually becomes the actual website. You can see the status (and any build errors) in the CI / CD Pipelines section of the repo. Amazingly, I had no build errors. However, I had forgotten to update the “baseURL” in my config.toml file to “https://wetlandscapes.gitlab.io”. So, after that was dealt with, the site was ready in just a few minutes after that. Amazing!